
Today is my husband's birthday. I would have liked to have wrapped up a new chain saw, tiller or even a toy tractor. But when you're a new farmer, your farm is your gift!
I did buy him a new box of ice cream...Heavenly Hash- his favorite. I'm also making his favorite dinner: chicken fried chicken, mashed potatoes and gravy. Mmmmm.
This is a simple country meal. Humble ingredients, simple techniques. But the devil -as they say- is in the details. And the details in this dish is the pace and order of the steps. For this dinner, I like to start with the potatoes.
In our house, potatoes are a family staple. We love potatoes. Any kind of potatoes. Roasted potatoes, scalloped potatoes, fried potatoes, cheesy potatoes, potato salad, Charlotte potatoes, creamed potatoes, potato pancakes, boiled potatoes, smashed potatoes, and the undisputed King of Spuds: Mashed potatoes with whole milk and butter. Mmmmm.
I've heard that people have problems making flavorful, creamy mashed potatoes. Once they know the Foundational Secret of the Mashed Potato, they will never have a problem again. Promise. It's not even an issue of the type of potato you start with. Idaho, red, yukon, fingerling (which would be a travesty and a waste of a lovely fingerling), or white...they all cook the same way.
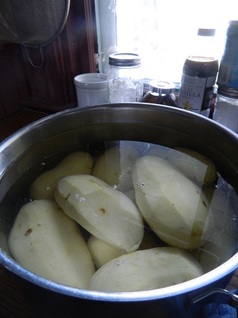
The secret is COLD water. Yes. That's it. I wish it could be something more earth-shattering. But it's not. Cold water.
Peel the potatoes and let them sit in cold water until you are ready to cook them. Then put them on a high burner and bring them to a boil. Once the pot boils, reduce to medium and cook until a knife can easily be pushed through the biggest potato. Try to keep all the potatoes the same size so they cook at the same rate and finish at the same time.
The nice thing about this method of cooking is that potatoes can be peeled on Sunday - or whenever you have time - and left in this cold soaking water until you're ready to boil them, or slice them or prepare them for any method of cooking or baking. There's no need to acidulate the water (adding acid such as lemon juice) as long as the spuds are completely submerged.
Once they are cooked through, drain them in a colander and add two cups of milk and a stick of butter per 5 pounds of potatoes. Put into a mixing bowl and mix on medium until the potatoes are creamy and smooth. This can be done with a hand mixer as well, or if you're desperate (and strong), with a wooden spoon. Season to taste. Set aside and cover to keep warm. The nice thing about this method is that you can have the potatoes waiting for you, not the other way around. If you find there is a lot of time before you serve your meal, you can sit the mashed potatoes down into a bowl of hot water and cover the whole thing with a towel- they will stay plenty warm!
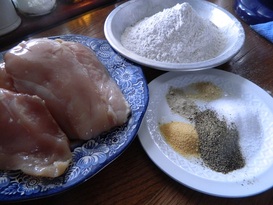
Once your potatoes are securely resting and warm, you can turn your attention to the chicken. In a deep dish or pie pan, add 1 cup of all purpose flour and 2 cups of self rising flour. (You can use whatever flour you have in the house, this is just the mixture that I like). To the flour, add 1 TBSP of black pepper & salt, 1 tsp white pepper, 1 tsp garlic powder and1 tsp onion powder.
Most of the time, I prefer real onions and real garlic, but when you're preparing a batter or a dredge to fry with, these powdered spices can be very useful. Real garlic and onions would burn and become bitter and unattractive.
Next, butterfly each chicken breast. Lay your chicken flat, place your hand flat on top, and position your knife in the middle of the thick part of the meat. If you keep your hand above the blade, you won't have to worry about cutting yourself. Place all your butterflied pieces into gallon ziplock bags and pound them lightly with a meat mallet. The thinner you get your meat, the more quickly it cooks and the more tender it will be. You will get a light and crispy fried crust and not have to leave the meat in the oil for a long time to cook the meat thoroughly.
Wash your hands.
Mix your spices with the flour. Using a serving spoon, distribute the flour evenly between the bags. Secure the top and shake the bag to coat all the meat inside. This is the easiest, cleanest way to dredge meat that I've ever found. Then place the bags into the refrigerator until you are ready to fry. Again, the key is to have your food waiting for you, not you waiting for your food!
Put the frying skillet on to heat. Start the warming on low and move it up from there. I like a cast iron pan for frying. Cast iron holds the heat more evenly; I also like the shape of the pan- deep and wide with a nice, flat bottom. There is an old saying: "Hot pan, cold oil: food won't stick". So prepare your pan ahead of time.
My oil of choice for nearly everything is extra virgin olive oil. It goes through less processing than many other cooking oils and contains heart-healthy omega-3 fatty acids. Other common oils such as vegetable, corn and soy oils are packed with inflammation-causing omega-6 fatty acids. Emerging research is suggesting that these omega-6 fatty acids are contributing to heart disease. For more information, a good place to start is: http://www.drweil.com/drw/u/QAA400149/balancing-omega-3-and-omega-6.html
When you're ready to fry, turn the heat up to medium (you're looking for an oil temperature of 350- 375) and shake the excess flour off each piece of chicken; lay it in the hot oil gently away from you to prevent splash burns. Cook until lightly brown and remove to a prepared sheet pan and hold in warm oven while you fry the entire batch. To make frying easier and cleaner, try using a screen to reduce splattering- they are widely available, although I purchased mine from Williams-Sonoma.
Once your chicken is finished, remove all but 1/4 cup of the frying oil and add 1/2 -3/4 cup of flour to the pan. Using a whisk, stir to coat all the flour in the oil. Add 2-3 cups of chicken stock or water; whisk to combine. Add 3 cups of milk and continue to whisk. Add more milk until you reach the desired level of gravy thickness. Season to taste, and build your plate!
Much of this dish can be done ahead. Organization, preparedness and cleanliness are the key to a delicious and wholesome meal. Enjoy!!
 RSS Feed